
Saturday, December 8, 2012

Thursday, September 20, 2012
latest contribution for storage.com
my latest article for storage.com. organizing for a move...
http://blog.storage.com/moving-tips-organization-to-make-your-big-move-a-little-easier/

http://blog.storage.com/moving-tips-organization-to-make-your-big-move-a-little-easier/

Monday, September 17, 2012
cooking rice without it boiling over
my life changed yesterday! ok maybe not. but, i cooked rice without it boiling over and creating a mess for maybe the first time ever!
i have a hard time staying focused in the kitchen because frankly, i just don't like cooking. i get easily distracted and end up boiling over or burning things a lot. i saw something at bed, bath and beyond that gave me hope for the boiling over problem, a "pot watcher."

it's a little ceramic disk that i thought you were just supposed to drop in with the rice (or whatever you're boiling) and it would magically keep it from boiling over. wrong. my mom enlightened me by telling me, "it doesn't stop anything, it merely makes noise which alerts you to the possibility of a boil over." well, that's lame.
so, i was back to boiling over every time (yes, every. time.) i cooked rice. i had noticed something on pinterest (asmallsnippet.com) that sounded like a great idea for boiling things that don't need to be covered. it said to put a wooden spoon across the pot and it won't boil over. sounds great! unfortunately, with the way i cook rice, that's just not possible.
because the way i cook rice is:

i have a hard time staying focused in the kitchen because frankly, i just don't like cooking. i get easily distracted and end up boiling over or burning things a lot. i saw something at bed, bath and beyond that gave me hope for the boiling over problem, a "pot watcher."

it's a little ceramic disk that i thought you were just supposed to drop in with the rice (or whatever you're boiling) and it would magically keep it from boiling over. wrong. my mom enlightened me by telling me, "it doesn't stop anything, it merely makes noise which alerts you to the possibility of a boil over." well, that's lame.
so, i was back to boiling over every time (yes, every. time.) i cooked rice. i had noticed something on pinterest (asmallsnippet.com) that sounded like a great idea for boiling things that don't need to be covered. it said to put a wooden spoon across the pot and it won't boil over. sounds great! unfortunately, with the way i cook rice, that's just not possible.
because the way i cook rice is:
- 1 cup rice
- 2 cups water
- bring to a boil
- cover
- lower heat
- simmer for 20 minutes and don't touch it!
so, last night i thought i'd try something that could work with a lid. string! i cut a length of string to go over the pot before i put the lid on and holy shiznit, it worked! here's a video...
you can see it wanting to boil over so badly, but nope! string to the rescue!
here's an after shot...

normally, once i'm done cooking the rice, the inside of the lid and all down the side of the pot are covered with a starchy, white mess. not this time! i was so happy. (and so was my little pelican salt shaker my mom got me. isn't he cute? thanks, mom!)
Saturday, September 15, 2012
the best kind of day
it's only noon and it's already been a full day of giving back. it started with my husband and i getting up early to go help pick up trash at the wetlands for coastal clean up day. we got there prepared with our gloves, bucket, trash bags and camel-back full of ice water.


we were assigned to pull weeds, but asked if we could wait for a trash crew instead. (we spent a day pulling invasive ivy at the audubon society in portland last year and frankly, care to never do it again. it's back-breaking labor!) so, we got put on a different crew and started picking up trash. really, there wasn't that much where we were looking (and there was a rattle snake sighting which was a little unnerving) so after an hour, they told us we could get our trash sorted and counted and leave. what? leave? we were planning on working for 3 hours and our bucket was only about 1/4 of the way full.


on the way home, i called my folks to see how their day was going and to tell them about our morning. when my husband and i lost our condo, we took our washer and dryer and decided to give them to my parents with the condition that their older, but still in great shape, washer and dryer go to a local animal shelter. well, my mom found a place in yucaipa that was thrilled to get the news, so my dad was installing the new washer and dryer while my mom was cleaning up the old ones to donate. having worked at 2 wildlife care centers, i know how huge it is to not have reliable washer and dryers, as there is always a mountain of laundry... always. i remember 1 shift at the audubon our washer and dryer stopped working and a volunteer loaded up her van and spent 4 hours in the laundromat. that must have been one stinky car ride!
i'm not writing this post for recognition or to brag, but to hopefully inspire. if you're never gotten out there, gotten your hands dirty, the back of your neck sunburned and dripped sweat like a boxer in the ring, you should try it! you may be surprised how good you feel at the end of it. or the next time you have an old appliance (in working order) that you're getting rid of, think of the local non-profits that may be able to use them. we're all on this big blue ball together and the more we all help each other out, the happier and healthier we and our future generations will be.


we were assigned to pull weeds, but asked if we could wait for a trash crew instead. (we spent a day pulling invasive ivy at the audubon society in portland last year and frankly, care to never do it again. it's back-breaking labor!) so, we got put on a different crew and started picking up trash. really, there wasn't that much where we were looking (and there was a rattle snake sighting which was a little unnerving) so after an hour, they told us we could get our trash sorted and counted and leave. what? leave? we were planning on working for 3 hours and our bucket was only about 1/4 of the way full.


we started walking back towards the parking lot and realized, with people cleaning off of the trails, that left a lot of cigarette butts and things on the trail itself. we cleaned as we walked until we got back to the parking lot and then spent another hour walking the perimeter of the parking lot picking up trash and cigarette butts. it seemed kind of funny that people were walking out to their designated spots to pick up trash, but were walking over so much trash on their way out there. when we finished with the parking lot, our bucket was darn near full! once we were done, the crew asked us what kinds of items we picked up and what the most unusual item we picked up was. thankfully, ours were pretty standard, mostly straws and straw wrappers, gum wrappers, styrofoam and cigarette butts. we felt lucky that we didn't find any needles or condoms!

i'm not writing this post for recognition or to brag, but to hopefully inspire. if you're never gotten out there, gotten your hands dirty, the back of your neck sunburned and dripped sweat like a boxer in the ring, you should try it! you may be surprised how good you feel at the end of it. or the next time you have an old appliance (in working order) that you're getting rid of, think of the local non-profits that may be able to use them. we're all on this big blue ball together and the more we all help each other out, the happier and healthier we and our future generations will be.
Tuesday, August 28, 2012
up-cycled face cleanser bottle
another installment of "what the heck can i do with all these plastic containers?"
today's answer is "make a hanging succulent holder"


today's answer is "make a hanging succulent holder"
- i started with a facial cleanser bottle.


- i then cut off the end with a knife and scissors. i wasn't too worried about getting it perfect, as i plan to wrap it with fabric.

- since i knew i wanted to make a succulent holder out of it, i figured i probably better add some drainage holes. to do this, i stuffed the container with paper towels to hold its shape, then i heated up a nail (while holding it with pliers) and slid it through the plastic making sure not to go through the other side of the container.

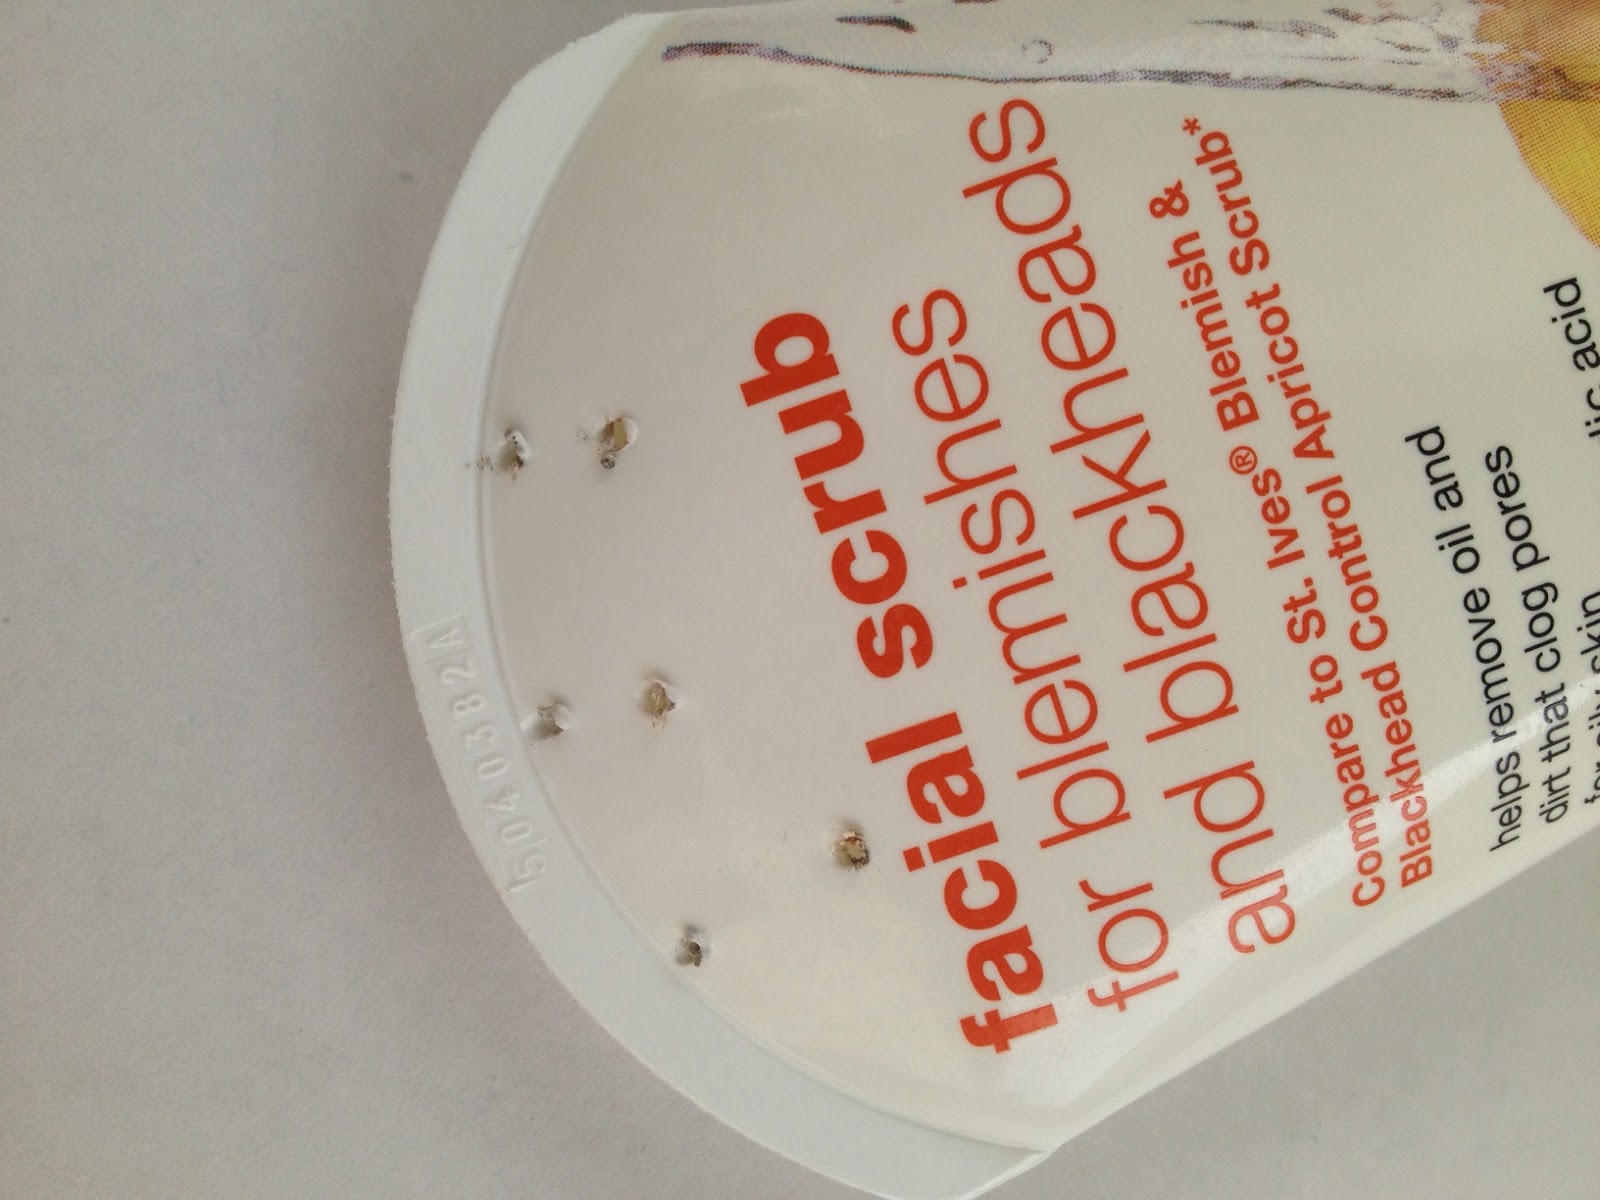
- then i painted it with spray primer meant for plastic...

- and stuck it on a rake handle to dry.

- now to make it pretty... i used some spray paint i had left over from my bike project (bike love) and i found some corresponding fabric in my craft drawer. kismet!
- i folded the fabric under to create a nice edge for the bottom part, sprayed adhesive on the back of the fabric and carefully wrapped it around the container making sure to leave enough to also wrap around the top edge and into the container to hide my less than perfect trim job.

- next, i wanted to add a little flair to it, so i cut a keurig k-cup into a flower and spray painted that with the primer and then some chrome spray paint also left over from my bike project.

- i added a cute little purple button i found in my craft drawer for a pop of color and hot glued a pop tab to the back of the container as a way to hang it.

- voila! now i have a cute little planter to hang a succulent in :)

Thursday, August 23, 2012
she's crafty
after watching craft wars and storage wars texas (there are 2 girls on there that refurbish old furniture and things) yesterday and looking at reuse connection's facebook page this morning, i just had to do something crafty, but what?


i started by getting out my bag o' recycables that were slated to go to my in-laws' house since we have no recycling at our apartment complex.

i chose 2 items: an old bath and body works (hereafter called bbw) soap dispenser and some olive cans. i started with the bbw soap dispenser.
- first, i had to get the labels off. no easy task. apparently bbw doesn't want people making things out of their old bottles. not without some serious elbow grease anyway. however, yesterday, while trying to get some old stickers off a computer monitor, i learned that olive oil works. i peeled the stickers off and olive oiled the back of the bottle. by this point i had decided i was going to make a bud vase, so the sticky on the front didn't matter as i was just going to cover it up anyway.
- next i found a flower on some scrapbook paper that i knew i wanted to incorporate so i cut it out. i thought i would put a complimentary color of paper behind it but wasn't sure how to get the size right. i then realized i had peeled the front label off in one piece and could use that as a template. hurrah! i lightly taped it to the paper i wanted to use and cut it out.
- now it was a simple task of using some spray adhesive to adhere the paper to the bottle.

**a tip for using spray adhesive**
i like to keep an old magazine handy (martha stewart works great, cause it's a bit larger than others) so that i can open up a page, lay down my paper, spray it with the adhesive and then close the page. then, next time i want to use it, those pages will be glued together, so i open up to the next page and so on...


- i spray-glued it all together, ran some twine around the top with dabs of hot glue and finished it all off with a cute little brad. voila. bud vase:

next up were the olive cans. (trader joe's pitted green olives are the bomb! btw) the labels came off of these much easier. it also left a bit of sticky just at the seam, which actually turned out to be a nice way to temporarily hold the paper on to see if i liked how it all looked together.

- i chose some different papers, cut them to size and spray-adhered it all together.
- once i had the paper stuck on the can, i put ponytail holders around it to keep it all in place until the adhesive dried.

- i decided i wanted these to be able to hang, so i took the pull tab off the lid and attached it to the back of the can with hot glue and finished it all off with a bit of twine around the top.
here i have them displayed on my bathroom wall with air plants in them. how cute! i love turning trash into treasure, it gives me happies. hopefully reading my blog gives you happies, too. :)

Thursday, August 9, 2012
new blogger for storage.com
i've started guest blogging for storage.com! here is my first post about having a garage sale...
http://blog.storage.com/garage-sale-tips-getting-the-most-out-of-your-garage-sale/

http://blog.storage.com/garage-sale-tips-getting-the-most-out-of-your-garage-sale/
Subscribe to:
Posts (Atom)